Saturday, March 20, 2010

I am so cheap-feed bag weed barriers

We try and reuse or recycle as much as we can around the homestead and one of the things we had not come up with a use for was until today was the goat,chicken and bunny feed bags. Doesn't it figure that something we have 7 of each and every month would have no other use?

The other day we saw something on a video and it made the manthing think. No worries he said it didn't hurt. I do not remember what it was we saw but what ever it was that spurred his moment of genius hopefully has just made our gardening life much easier.

Each feed bag has three layers. Two of them are plain brown paper and one is plastic lined. The plastic one is between the two other layers but nothing connects any of them so all you need to do is separate them in order to use. A cut along the bottom seam to remove it and a slice down the side and SHAZZAM! Two approximately 3x2 foot weed barriers and one easy to roll up and dispose of piece of waste.

The front hill has in the past had issues with water flowing and erosion in heavy rains even before it was gardened. We decided to till it up and begin gardening in this area the year before last. Last year we decided to go with a contoured strip type garden on the hill in order to stop the erosion yet be able to use this wide open space to grow some decent crops. Basically what we are working for is many raised flat beds with grasses in between and on the sides to keep the soil where we want it. Between trying to contour it and still being a fairly young bed, weeds have been a huge issue.

Today by using the feed bag weed barriers hopefully we can ease our work load and help us in reaching our eventual goals for that bed. It cost us nothing but 3 minutes of time to make and covers 6 sq foot per bag. At 7 bags a month that is 1008 square foot of garden space I can have a free weed barrier for. It takes just a few minutes extra to put down when planting but will save us untold amounts of time and frustration. It won't just help with this crop of veggies but hopefully forever more or at least as long as I need to supplement critters with store bought feed.

Here are the cabbage plants that went in  and the carrot strips that we tried this afternoon. It looks a little bit ugly right now but we figure with a rain the soil holding the barrier down will settle off to the sides of the raised area and the weeds should not be able to get through. For the cabbage we cut an X in the paper, planted and then  put a dusting of soil round the base of the plant to hold our cut edges in place. For the carrots Ii made a half inch strip cut out  every 6 inches across the bed. I have never used any weed barriers but leaves in the past so this should be a neat experiment although we don't see how or why it wouldn't work  splendorifically.

around the homestead-amending the soil

Today was  spent both amending the  soil and planting. I worked on getting the potatoes in the ground  while the manthing loaded up the truck with a load of compost to take to some of the beds. His original intent was to load  the truck, move it up by the shack  and then wheel barrow the entire load down in to the front bed.


As is  usual with  well laid  plans, things did not go accordingly.  I needed more space for potatoes than I thought I was going to  and the only other bed that  could hold all the remaining  taters I needed to plant had not had any amendments put on it as yet so  he instead needed to take the first load of compost to the beds down in the bowl area rather than the front hill.

  In the end I think this  worked out better overall as the whole taking the wheel barrow loaded with compost down wooden ramps was much more work than he had anticipated. There was also a bit of a danger factor to the whole scheme as once the WB  skidded off the ramp going   down gravity took over. Have you ever tried holding a 300 pound wheeled object back on a  20 degree incline with wheel barrow handles? Any how, after his third trip down  to the front bed we decided that once we he got the truck  unloaded we were going to find another way to finish amending the soil in the front hill beds.

After the last several days of beautiful weather and putting in a lot of time doing loads of pretty manual labor we are ready for a day of laziness and rest.

indoor and GH fall/winter garden 2009-my baby pickle

and it only took it four months  to get to this point lol

around the homestead-tilling/ working up garden beds

Yesterday the manthing spent most of his day tilling up garden beds. We can't use a regular tiller in many of the terraced beds here but on the conventional beds we can with a little bit of wrestling, brute strength and bronc riding skills. We now have all but the tobacco bed in the holler tilled and two small beds finished and ready for adding nutrients and then planting.

We only have three flat land beds here on the property, the rest we pretend that they are  and  where we can we try to  maneuver "the beast" through the beds. In some of them it means that you are continually tilling at a peculiar and might I add rather dangerous angle. On a regular basis we break the bolts off that hold the tires on, no worries though as  we got smart and bought a dozen extras. At all times one has to hold the tiller either back to keep it from  pulling you down the hillside or pushing it up with all you might to keep it on the hill so that it doesn't  slide backwards and till you up, it really is a FUN chore around here. Thankfully it only happens a couple times a year  and we have never had anyone turned into instant compost.


The remainder of the beds (somewhere around 20)  all need to be double dug each season to get them into planting condition. The longer those beds are around the easier it gets to  dig them up, but building  them and the first couple years of using them, they are a BIG chore. Unfortunately  as we get older and our bodies hurt  after a good day of working in the gardens  we are learning that we need to start thinking about 10 years down the line and how we will do things.  A couple weeks ago when we first started working on the beds, I made mention to  several how I would love a mini  cultivator. Low and behold as per usual, when one puts a  true need out to the universe the universe provides. Our best  friend has just bought a little mantis tiller. We will share the big tiller and the mantis between the two homesteads as he only needs the larger one  twice a season and we only need the tiny one two to three times a year. It should work out very nicely between the two places  and make our job much much easier

Friday, March 19, 2010

around the homestead-spring clean up

Each early spring  we try and do a little spring clean up around the homestead. This year some of our cleanup projects are pushing the woods line back to where it belongs,  scrapping and salvaging what we can from the fifth wheel, cleaning up the kitchen remnants down in the holler and work on some of the older flower/ herb beds.

The last two days I have been working on the azalea bed out in front of the shack.  I had neglected it for  three years and it showed. The raspberry bushes  and wild grape vines had nearly taken over. Poplar trees had sprung up in the middle, sugar bush  all around it  and it looked  generally horrible. On top of all that one of the azaleas had  something wrong with it last year and the ends of most of the branches had died off and were looking pretty nasty.

I should have taken a before and after picture but didn't. Here is what it looks like now that it is all cleaned up though

around the homestead- winter heating wood

Yes, I know winter hasn't  ended this year for many folks  and here I go  writing about  next years winter wood for heating. Actually I am not just going to write about this coming  years wood but also the following year as  wood for heating needs to be thought of well in advance of  actually using it.

Because of the lay out of the land, the type of wood on the land  and the actual lack of land here on the homestead, wood lot management plays a big part in the how and why of  what we do for our wood needs. All of our heat  in the winter is produced  with wood, as is all of our cooking.  Each   winter we use about 5 cord of wood though each year we try to use less by closing off portions of the shack , insulating doors and windows more and this next year we are going to try and add more fire brick to the stove box to insulate it more so that it holds the heat.

We do not have a tractor here on the homestead and at this point we don't even have a working 4 wheel drive. Many places  here on the land are inaccessible to both any way so we must think about where we fall trees and how we are going to get it back to the house. A mule team would be our best choice, but again, mules take feed and space, neither of which  we have enough of in order  to justify a team of mules at this point.

Most years we try and pick a trees in strategically located spots so that we can either roll logs or rounds down a hill, which we have plenty of, to a roadway where we then split, load on to the truck and then  haul to the shack. The last couple of seasons however,  large hard wood trees have come down  behind the shack on a hillside that goes into a deep  gully. There is no road   down in  there and there is no easy access but we were not going to let this wood go to waste. 

Just as our luck  would have i,t last year when we nearly got the ones that had fell there  two years ago cleaned  up, we had  another large one fall  in the same place.  Again, we couldn't let this wood go to waste  so we the manthing has been busy cutting, splitting, chopping, throwing, throwing some more, hauling and stacking. This weekend we should know how much more, if any, wood we will need for the coming season and   then begin dropping the following years wood so that it can begin to season.

 Late fall, winter and very early spring are our wood working seasons. We are both allergic to bee stings so we try and stay away from the wood piles as much as possible in the warm months  and wood is a much more enjoyable experience when it is cooler weather.

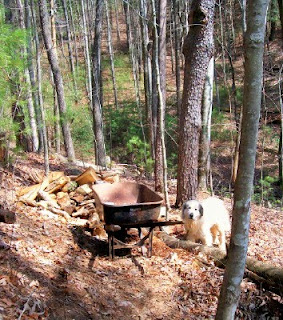
So here is how   our manthings wood   moving and hauling has  gone. It is hard to tell in the pictures the incline we are on.  If you look across there is another hillside over there and the bottom of the hole is barely visible. This is where the trees fell and were cut up and split. The wood was then  thrown section by section up to where  it could be hauled out with the wheel barrow. This pile is about 65 foot out of the hole with a 30 foot  vertical rise.


He then  loads it into the  wheel barrow and wheels it up the rest of the way to the shack, another 100 foot or so in distance  and another 20 foot vertical rise where it is then stacked to finish seasoning for the coming winter.


Yes, this seems a lot of work and it is, but   understand that  we have to use and choose the wood wisely that we harvest here on the land. We are caretakers of the earth  and in doing such we must be sure to not over use our natural resources nor change our ecosystem that we live in. We must respect the environment around us and in doing so  Mother will provide. Part of this respect is to clean up the messes she leaves when  she has a little temper tantrum.To us  that in itself is providing  for us, we just often don't look at it  this way.

Thursday, March 18, 2010

signs of spring-violets

peanut butter granola

2 tablespoons butter
1/2 cup peanut butter
1/2 cup honey
1 teaspoon vanilla
1/4 teaspoon salt
1/2 teaspoon cinnamon
3 1/2 cups rolled oats
1/2 cup raisins (optional)

melt first three ingredients in a sauce pan. Heat through, do not boil. Remove from heat. Add vanilla, salt, raisins, cinnamon and oats. Coconut, peanuts and other dried fruits can be added here. Stir until coated well, turn our into a 9 x 13 pan or bake sheet and bake at 375 for 15 minutes. You can also do this on a wood stove top or in a skillet.It should be brown and crispy. Remove from oven and let cool. Break up as needed and store in airtight container. Serve as a cereal,add to yogurt or just eat as a snack.

Wednesday, March 17, 2010

goats -mid afternoon snack

"squiggletown Manor"-large worm bin

We have pondered the thought of making a larger size worm bin than the small totes like we had been using. Yesterday while raking and doing some general clean up around some of the beds I had the thought again. This time instead of pushing it to the"someday side" of the  "to do" list  it was pushed to the now side. So come chore thirty last evening I dragged the manthing over to the outside bunny hutch and told him what I wanted. We needed to have a horizontal flow  worm bin to fit directly under the bunny hutches to catch all dropping from their cage and the ends needed to be removable so that we could harvest both worms and castings.

We didn't have much in the way of scrap materials to work with. We have materials  but we try and save the better materials for bigger, better projects. A lowly worm  bin  was not deemed  worthy of these materials. That pretty much narrowed our option down to  old tin  roofing. Oddly enough the tin worked out perfectly as though it was  made just for that purpose. Two whole pieces for the back and front and two half pieces for the ends. The middle  screen divider is a scavenged  incubator rack that we have had  laying around. We already had smaller worm bins so there was no cost in the worms. The only cost of the whole project was maybe 2 bux in nails. Start to finish  the project took about 2 hours for the two of us to complete and to migrate the worms.


The "squiggletown manor" measure  just over 5 foot long and is 28 inches wide. Height is about  30 inches.  The divider is at the half way point of  the bin/ hutch. There is one rabbit above each section of the bin. Most of the poops get caught in a tray under the bunnies, the urine however will go into the bin.  Only one side of the bin will be used at a time. 3-4 times a year we will migrate the worms, clean out the castings and send the worms to various beds to live and work.


For the  bedding  we used a bit of dirt  that we had removed from around where  the bin was going and leaves. We made several layers of each and watered it all in with 5 gallons of water.Next we added the
worms and a bit of their casts from our other worm bin.


  I transferred   several thousand worms to the new bin. I was amazed at how many were in the bin I had going. Once we had them transferred into their new home I covered them up with a thing layer of dirt and leaves as they don't like light.  I kept some of the worms  in the small bin as well. I like to keep  some up near the house rather than having to transport everything long  distances. It is much more convenient that way. About a month before harvest we will fill the new side up with bedding materials and food for them. Everything I have read says they will migrate through to the other side on their own. We will see how it works out. If not, we will manually harvest, its not that big of a deal (rollseyes). I know it ain't the prettiest thing in the world but it should be functional and that is all that matters.


I cant wait to see how this works out, if it does well we may  have to make more large bins for more worms. I am hoping that  we can  lure some big old local night crawlers  in to live at squiggletown manor as well. A night crawler and trout bait  business in the local area may not be a bad business to get into and certainly cant be worse than  being unemployed.  I have also  seen the prices on  packaged worm castings and that is another idea. I do sometimes wish that our driveway was a bit more able to handle traffic  and that it was a bit more accessible. We could have us a very  eclectic little business, unfortunately to go and rent a place it wouldn't be feasible economically. In the mean time we will keep on working toward our own sustainability, we may be broke but we are going to eat.

signs of spring- daffydilli's

Monday, March 15, 2010

simple supper-creamy root veg soup

I started out today going to make "grandmas turnip soup"  but I quickly realized as  per usual that the recipe would  not suit  our palettes in the way I wished and to be honest it was too white in color  to be  appetizing and appealing to the eye. My alterations to the recipe no longer left  it a turnip soup, it now turned it into a root veg soup.

creamy root veg soup
3 turnips cubed
2 medium potatoes cubed
3 slices bacon cut in small chunks or cooked in advance and crumbled
one medium onion diced small
1 medium carrot shredded or sliced thin
2 cups veggie stock  or 2 cups water and 3 bouillon cubes
2 tbsp flour
 dash pepper
1/2 tsp cumin
 cover potatoes and turnip with water and boil until tender .Drain off  all but about one  cup of the  water and Puree remainder with veggies  in food processor In the meantime in large sauce pan, cook bacon  drain off all but 2 tbsp fat,add onions  and saute.When done add the flour stir  and slowly add   the veg. stock, spices  and  all but a few tbsp of carrot. Heat and simmer for 5-10 minutes,reduce heat. Add milk and pureed root veg, stirring continuously until  mixed. Heat through and serve hot. Garnish with  some carrot bits and some green herbs. I used kale and parsley on ours. If you wanted to used bacos or some sort of substitute  or emit bacon altogether it would still be very good. Some cheddar cheese added in would be nice  as well. If i had thought about it I would have added a bit of parsnip too and it would have given a nice flavor.

This was  a very good recipe and made a thick,  hearty, tasty and very healthy  soup. I served ours with  toasted cheddar baguettes. It is a very cheap  meal to make. I think it could be a very versatile recipe depending on ratios of veggies you put in. Maybe  add some sun dried tomatoes and corn bits and serve with croutons.

castor bean

In one of my seed swaps a  while back someone asked for  some castor bean seeds. In one of our  correspondences  I was asked for a bit of information on them and I completely forgot to give  her any answers. I remembered the query the other day  while working on some garden beds  and I decided I better get some answers to her before she plants them.I do not want her coming to me next fall wanting to do me permanent bodily harm.

Castor is a beautiful plant and it has some  uses medicinally,  as bio fuel, in  lubricants  as well as for supposed mole control. At the same time the seeds are poisonous, VERY poisonous, one milligram of seed can kill an adult. They  contain  Ricin in the seed and are deadly. In fact gloves should be worn when working with the plant at all times. Many people simply grow the plant for decorative purposes and cut the seed stalk off while it is forming eliminating most of the problem with the plant. Even so, care must be taken when handling the plant as well as it emits compounds that can cause allergic reactions or even  nerve ending damage in certain people. I have  read that in some states to possess the beans and to grow the plants is illegal, I have not found anything to validate that claim however.  For a more in depth write up on  the dangers and some of the viable uses of  the plant here is a really nice link.

 
All that said,  if one chooses to grow  castor beans for whatever reason, they really are a beautiful, fun to grow  plant with  some stunning colors and foliage. They love high temps and humidity but are also drought tolerant. There are several different types of castor all having different highlights, leaf and stalk  colors. Castor is rapid growing and can get ginormous in one season. A plant can get 15 foot tall and 6 foot around in one growing season. These things are like trees, literally.  The root systems are nuts and  can often be grown as a perennial rather than an annual. Do NOT plant these in a veggie garden bed, they really need their own space because of the root system. They do however make great shade providing canopies for smaller plants.

When planting, soak the bean in water  overnight then scratch the surface of the seed. Plant one inch deep and watch them grow.In the fall either trim back the plant to the ground and treat it as a perennial or pull  at discard. Do NOT burn. Do NOT compost.

Here is a picture of the root of a plant  and of a seed stalk. Each spiny ball contains 3 seeds enclosed in a thin shell.


monday's mountain musings

Bleh, enough of this dark gloomy, damp, wet and all out rainy weather. This is seven days of  this nonsense now  and it is starting to wear on me a  bit and my butt is going to callous. I know I could be washing walls, cleaning cobwebs, folding laundry  or any number of inside activities but as i said the gloominess is wearing on me.

To top it off the last couple days I haven't been  feeling all together great so  am being a whiny baby  about not feeling well.  I do feel much better today than yesterday but  still have the achy, stuffy head, chest congested  feeling about me and an earache too. I have been nursing my self with  my  viral care tincture,  smoking  my mullein, rubbing my feet with  oregano oil, drinking herbal  teas and  I am  going to mix up some of "grandmas turnip soup" for dinner. Oops, I forgot to mention the eucalyptus salve on the chest too. The aroma that surrounds me is  definitely interesting at the moment to say the least.

The gardens are all  doing seemingly well. Most all the seed  that has been planted has started to germinate other than the tomatoes n tobacco from the other day. My mesclun mix that overwintered outside is forming seed heads, YIPPY! Maybe this year I will actually master harvesting lettuce seed, something I have been  unable to do successfully thus far.


Truth be known, I have only been attempting to save our own "salad" seeds for two years. When it comes to saving my own  seed, I don't have much patience with things. I get sick of looking at the useless plants and yank it out or I decide to save a crop for seed that  was not planted in the right time frame for me to get seed. Last fall I came so close  to getting good seed  when we had a killing frost and turned my mother plants to mush. It was a nice surprise to go n see my now quickly growing mesclun   this morning and see the seed heads  forming.

We should be planting our potatoes n  cabbage plants this week but since it is so wet, we may have to wait several days to be able to get into the beds. We will most likely begin working on pushing the woods line back to where it belong as it  has started invading some of our space over the last couple years. I also  need to get into the azalea garden and clean up the briers that started growing and weren't kept in check. There is also a poplar tree in the middle of it. Those things are just like weeds and I swear if you don't remove every bit of root when removing one from somewhere, three grow to replace the original. 

Then again, since I don't feel all that good and the weather isn't all that great I could roll out the bed, confiscate the manthings computer (it has better sound), make me some honey sage tea and curl up with every single episode of "the magic school bus" that a  sweet friend just sent me.(grin).