Showing posts with label alternative gardens. Show all posts

Monday, April 9, 2012

the hugulkultur experiment-part 2

With the success of the hot tub hugulkultur bed we decided to try it out in a normal garden bed. For this experiment, we are using use an already established bed (of weeds) that we double dug when the manthing was laid off and we were on a bed building spree. This bed has not successfully grown anything (except weeds) since we dug it and began throwing amendments on it. It was also convenient because we had some piles of brush nearby, making our job (manthing's job) much easier.

The basic principle of hugulkultur is digging out a hole or spot and then filling it back up with things n stuff that will break down over time into a nice soil while having the benefits of water retention and a raised garden area. Our main reason for doing this is building healthier soil, since we try to maintain a closed homestead and purchase no outside fertilizers, soils, mulches, etc. We get over 70 inches of precipitation a year, so, water retention is not too big of a deal for us most of the time.
The process is pretty easy although it is a good work out if you don't have a mechanized earth moving contraption and live in mountainous terrain. This bed is about 14x5 and was a 2 (half day) job for one person. A young, in shape, person could probably do one in a day and live to tell of the experience. Us older folks have learned not to beat ourselves up when time is not of the essence so we tend to take things a little bit easier when we can.

Our observations thus far...

The dirt that comes out of the hole is very likely not going to be enough to cover it back up, especially if you mound it like most reference sites suggest. Be prepared to have extra dirt somewhere nearby that is accessible and easy to get to the new location.

It is a great way to use downed trees and/or brush and limbs from cutting firewood. But,it takes a whole lotta material to fill that big hole back up. Have plenty (more than you could ever imagine) of filler nearby or in a place that is easily accessible. For those that heat and/or cook with wood or live in an area where wood is sparse, this could be an issue and should be weighed before you decide to do digging massive holes in your lawn.

Saturday, March 5, 2011

the life box

When our mushrooms arrived yesterday they were in one of those living boxes that are seeded and you rip them apart to plant them. In a few short years, you then have little trees to plant about your little part of the world. Each box is seeded with a number of different tree species as well as accompanying fungi that are supposed to create a little ecosystem. On the outside of the box is a code that you enter into the lifebox website to find out just what seeds your box has in it. Ours contains the following. It looks to us like most all of these trees could potentially grow and thrive here in our environment.
This is not an endorsement of the company nor an advertisement, just something we found interesting and thought would be a fun experiment to document and see what happens. I will likely begin the process this weekend sometime and then do a periodic update on it and see what we end up growing. It should be fun or a really long drawn out ordeal that ends up with nothing :)

The life box site is quite neat. They, of course, sell the boxes but they have a tree planting part of the site where you find the type seeds you have, learn to identify the seeds, and how to germinate and care for the treelings. You can also mark a map with your location and see other box forests.

Friday, October 8, 2010

updates on the "junk" gardens


Here are the outcomes of the junk or alternative gardens that I made this year. I cannot complain about  a single one of them  as they have all done great. In fact, they have  performed better than I could ever imagined  they would and will definitely be making more in the future. I have found them to be quite fun  and very easily managed as well. The only fertilizer used on any of them has been bunny poop.  The fan garden was neglected more than it  was cared for and still did well. The tires and the gutter gardens both have to be watered frequently but other than that, they also  produced/are producing for me.

I  can't wait to make more of these type beds over the winter. I am hoping to make a movable  wick bed and we are planning on dropping the frame of the trailer down to turn it into a large divided bed with wicking. I am positive I will  find more junk as time goes on to experiment with.

Friday, March 5, 2010

I am so cheap-aquarium hot houses

 The other day an internet friend asked me if those were aquariums that she saw in one of my pictures.This  is such a cheap and easy garden helper that I  have used for the last several years and I just assumed everyone knew about the magic of them. I was wrong and I know better than to assume  anything.

So, for those that do not know, don't throw those old fish tanks away!! Those old, cracked or  unused aquariums that are stashed in attics, garages and closets everywhere have  a perfectly good use  on a homestead of any size and any where. They are a dime a dozen at garage sales, flea markets,dumpsters and curb sides the world over and to buy a small 10 gallon one  brand new it  will only set you back about 10 bucks.Not a bad price for a mini hot house that is lightweight, easy to clean, able to be moved and never needs  repairs.

One method of using the aquariums is  inverted over the top of plants out in your very early spring or late fall gardens. Here, I am able to  use them all winter long  and keep a few greens alive under the aquariums. Though they do not grow much during the winter months,  as soon things warm a bit the plants under it begin growing immediately. When temps warm enough during the day (over 40) I tip the tank up and then put it back down at night.If I dont the plants will cook in there.  Small container plants can also go under them to give them a boost in the early  spring and you an earlier harvest on some of your veggies.

Once I know the  over wintered greens and herbs are not going to get any more super hard frosts for an extended period of nights I bring the  tanks into the greenhouse  and they become my small cold frames in the greenhouse. Since space is  limited in there rather than trying to lift them up and down daily  I  sit them upright and place my seed tray or  cups in there where I can water from the bottom and on real cool night cover with  a layer of plastic and blankets if need be. If you dont have a greenhouse  you can do the same thing out side and either invert it over your seed pots or trays or use as above and cover on very cold nights.

 I do not have enough old aquariums hanging around the homestead to move all my baby plants to the  greenhouse real early, but I can move a fair amount and not have to worry about them freezing  on our still   low 20 degree nights.

Saturday, February 13, 2010

winter sowing of seeds

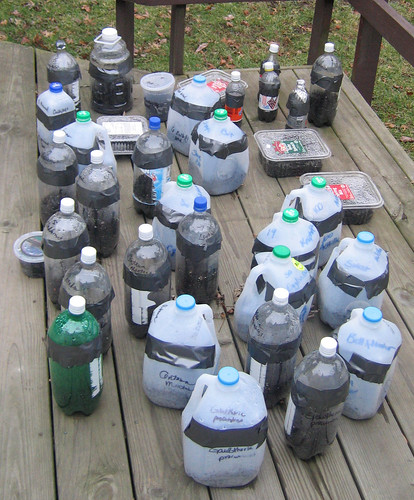
Much  like the seed ball method of  planting, winter sowing   lets the seed germinate and begin growing on its own accord, when it is ready to begin growing. It is also a good method for those of us wanting to start seeds early yet  do not want to depends on  lights, seed mats, containers, soil mixes  and other store bought stuff or  for those of us that simply cant afford all that stuff.  We are somewhere in the middle  but  our ultimate goal is to not have to  depend on electricity of any sort for our food growing. People just 75 years ago could do it so why cant we? 

The idea of winter sowing is supposedly  the brain child  of Trudi Davidoff after she had too many seeds to start and not nearly enough space. I however have a very hard time thinking that the idea of winter sowing is something that was just  thought up in 1998. I am sure she was not the first to ever figure out that  a seed left in the ground over the winter often  germinates when the time is right for it to do so. Walk out to your compost pile sometime and see what all  volunteers or what grows back from year to year if you let  over ripe fruit stay where it falls. Again, this goes back to the seed ball or Fukuoka method and permaculture practices,  therefore, I am  perdy darn sure it goes back further. However, Ms Davidoff has been accredited with the invention of winter sowing and I am   fairly positive she has made herself  a good bit of money off the whole idea.

The beauty of winter sowing is that you can   use this method, be successful with it and yet it costs literally nothing. There are no kits( there are actually) to purchase, no special soils, no fertilizers or  other special needs. All  you  need to do is use your imagination and recycle  some of the trash generated from things  we have already purchased.

Some of the more common container for winter sowing are milk jugs, two-liter soda bottles, salad take-out containers, and big plastic jars (the kind pretzels,mayo or mustard come in). Truth be known , the only real  requirements are that it must be able to hold at least three inches of soil and  must have head room for the growing plants.

Cut container in half if using milk jug, soda bottles or plastic jars.

Cut air holes or transpiration slits into the top of the container.

Make several drainage holes in the bottom of your planter.

Fill the bottom of the container with at least three inches of whatever soil you like best, and moisten it well.

 Sow your seeds according to the package directions.

Cover your container, and set it in a spot outdoors. 

 Condensation is a good thing. If there is no condensation, it either means that you have too many transpiration holes (tape over some of them if this is the case) or your soil is drying out.

As spring arrives, and the air warms up, your transpiration holes should be made bigger and bigger, until you remove the top of your container entirely. This is the winter sowing way to harden off your plants.

 After they are hardened off, transplant out in the garden.

Many people like to start annual flowers and  baby trees  with this method, I prefer herbs and veggies. Here are some  that  do well with this method of  seed starting.  

Allium family (onions, shallots, garlic, chives)
Artichokes 
Beans
Beets
Brassica family (cabbage, broccoli, kale, collards, etc)
 Celery
Celeriac
Chards
Corn (select an "early" type as it can germinate at lower temps)
Curcubit family (cukes, squash, pumpkins, melons, gourds)
Herbs (edible and ornamental)
Leafy Greens
Lettuces
Nightshade family (eggplant, tomatoes, peppers, potatoes - from real seeds, not seed potatoes)
Oriental veggies (any)
Parsnip
  Spinach

permaculture-seed balls

In the true laziness of hippies we have been trying to increase production from the land while reducing our work load. The only way we can possibly do this is through using more permaculture practices. M. Fukuoka is the person given credit to for this style of gardens or growing techniques. It is more often associated with large areas of barren lands in an attempt to get the land back in shape after logging or strip mining etc. We are using it to balance out our environment more than anything (bugs, insects, critters n birds), along with trying to see what will grow where as well as erosion control and true laziness.

We thought it would be a good way to use us some older seeds(veggies) and experiment with squash and herbs as well as a few grains, grasses, wildflowers and other flowers. All total we tossed in about 100 types of seeds. Unfortunately our experiment in this was a complete failure.We had fifteen inches of rain as the seeds were germinating  and we lost  most everything that we had in the ground at the time, seed balls  included.  Needless to say we will be trying this again in the near future  as we could tell if it hadn't have been for the deluge, it would have worked.

Here is a  good book on the subject, written by Masanobu Fukuoka.

Here is a good video on the subject however the quality is not very good. Its pretty old in the video world.

We had our own photo tutorial  of us making our seed balls unfortunately we lost them when we had a computer crash.

How to Make Seed Balls

WHAT ARE SEED BALLS?
Seed balls are one-half inch diameter models of the living world containing all the seeds for a complete habitat, wild or domestic garden, or both in one. Hundreds of kinds of seeds, soil humus, dry soil from your landscape and sand form the solid components of seed balls. When mixed with water and rolled into balls, they become little adobe gardens. They are cost effective, hundreds of times faster to apply and can be made by anyone anywhere in the world where there is soil and seed.

HOW TO MAKE THEM

Step 1: Gather your materials
  • 3 parts dry humus, from compost with live mycorrhizal fungi soil inoculates
  • 1 part dry mixed seeds, assortment of all desired native plants
  • 5 parts soil from your landscape, dried and sifted
  • 1 to 2 parts dry fine sand, cleaned and sifted (if clay does not have a little sand)
  • 1 to 2 parts water

Step 2:. Sift dry soil through a sifter to eliminate lumps.

Step 3: Measure out one part seeds to three parts of compost to five parts of soil. Thoroughly stir the seeds in a large container, cover with dry soil humus from compost, then add dry soil and mix well. If local soil does not have a little sand in it, you may want to add some aggregate strength sand. Add water gradually until a firm, suitable consistency is reached for rolling the soil into half-inch diameter balls.

Step 4: Pinch off wet soil from the main mass and roll between the palms of the hands until smooth and round. After a few seconds the soil can be felt to set up or organize, as the tiny clay platelets align themselves to each other and seeds as they enclose. It is important to roll the balls until this polymerization is felt, for then the ball will dry with structural integrity. Finished seed balls must dry undisturbed for approximately 24 hours.

Step 5: Once they are dry, seed balls may be stored in a cool, dry place or they may be broadcast immediately after drying and allowed to lay dormant in place until released by rain. SEED BALLS DO NOT NEED TO BE BURIED OR WATERED. Seed balls are perfectly content to simply lay about "sleeping" until the right amount of rain falls. When rains come, no matter where a seed ball has landed, something from the mix inside will be at home on the spot, so all possible habitat bases are covered in one broadcast application.

Step 6: Protected from predatory insects, rodents, birds and other animals, seed balls lie dormant until sufficient rains fall to start their germination. Then hundreds of sprouts explode from each ball as they eagerly reach for the sun. Enjoy your wildflower garden and use seed balls for future wildflower planting.

HOW MANY TO APPLY
A minimum application seeks a scatter density of at least 10 seed balls per square meter. Adequate coverage requires at least .2 grams of seeds per seed ball, or 2 grams of seeds per square meter. Restoration requires at least 3 grams of seeds per square meter. Between 8 and 12 kilograms, or 20 to 30 pounds of mixed seeds are required per acre.

WORD OF CAUTION
You roll all the forces of nature into seed balls when you make them, they have tremendous regenerative powers and they can be of great benefit. But used carelessly or wantonly, seed balls can cause irreparable biological disruption by effectively introducing alien species into a habitat with no means of coping with rampant invaders. The world is already host to numerous incidents of introduced exotic species that have radically altered native landscapes everywhere. Be careful of which seeds you choose and where you scatter them. We strongly recommend using only native species.
Photography by In Churl Yo. Text by Jessica Tipple and Andrea Delong-Amaya. This step-by-step was adapted from Wildflower magazine.

Friday, January 22, 2010

indoor garden and 2010 garden updates

I have baby tomatoes. I think they are absolutely adorable and by march first or so  we should be eating fresh  tomatoes from the vine. This plant has about 25 flowers I am pollinating each day with  my handy dandy  dread lock pollinator device. It really works a charm  and I never forget where I left it or cant find it. This pretty  girl will  be my mother plant shortly when I take cuttings from her and grow clones to give me an extra jump (I hope) on tomato season.

I have begun moving many of the other plants from the loft to the gh. I  will be moving more in the next week or so as the weather levels out a bit. The baby cuke , vining beans and the tomato will  stay in the loft while I start my seedlings this spring. The tomato is  stuck up there as it is  about 7 foot tall if I was to straighten her all out.

I am  still getting a few beans from my  plants and  others are doing fairly well. Sadly the hutterite soup beans have done no better for me in containers, in a controlled environment than they did outside for me last summer.  Not one I am  going to bother attempting to grow again. I am realizing after two years of serious indoor with minimal  supplemental lighting that if i actually want to eat produce from my plantings inside I needs to plant my indoor garden during the summer. Though they do give me a good  jump on   spring, the only thing I have been able to harvest regularly are greens and I can grow them yr round in the gh. I am figuring I will need to plant sometime in  July  in order to achieve my goals of year round  fresh veggies other than  greens.

 updated winter  indoor/gh garden  photos


I moved some of the greens from the loft  to the greenhouse and planted some of my cabbage that I had  brought into  the gh during the coldest of our weather.

I fed most the greens in the table bed to the critters and there were a few peas still growing from my last experiment. I then planted seed for peas, chinese cabbage and spinach. Soon as the other bed warms a bit and i can finish it. I will plant some lettuces and other salad fixins.

We also pulled the wood stove out this past week. This will now give  me more open flood space. If I make another raised bed in there it will give  me about 65 square foot of gardening space in the gh. I am thinking I may leave it as is until after the spring seedlings move through and  make the bed for this summer, fall and winter gardens.

updated 2010 garden photos


Saturday, January 9, 2010

indoor garden update


we have had some really cold weather recently but the gh seems to be doing ok despite not having a heat source in there. Last night we got down to around 5 degrees but we have been having teen temps at night for well over a week now with us not coming up to freezing during the day in about a week.

I have all the beds in there covered with a hoop type house and then they all have another layer of plastic and two other blankets or covers. As of yesterday nothing had died. Growth has near stopped but things look healthy overall.


The inside plants are growing well or fairly well. Tomatoes are flowering pretty good, beans are making a few beans, and the greens are giving us a meal or so a week.. The greens from onions n garlic and cilantro are all tasty too. Peas are shooting up a good bit and some of the newer bean plantings are coming up good. My baby cukes are doing well too but my zookini has failed yet again.

Here is the running photo blog of the indoor gardens.

Monday, January 4, 2010

a couple frugal gardening ideas

I love seeing different styles and methods of gardening that make gardening easier for those that are space, precipitation or monetarily challenged. Here are a couple ideas that I have run across that i think are pretty neat.

natural raised wood garden
What an ingenious idea these folks had. Looks great, seems like it would work and other than the time it takes to build, its free!! One thing that I would change is maybe laying a barrier between the sticks on the sides and the dirt to prevent rot. Then again, if you do that you lose some of the aeration of the soil.. Any who for those with limited resources this is a great way to build a raised bed even if it is a bit of work.. The one pictures is very tall too I would go with a typical foot or two tall bed and simply use larger sticks instead of the pieces of lumber for the braces.

empty plastic bottle garden/planter
This one I really like the concept of I especially like the idea for those with limited water supply, as the way it is set up, the system self waters.In the instructable it says to wire the bottles together as you place them inside the frame once you have poked several holes in it. I say phlooey why make more work for your self. I would make my frame out of logs or wood, make my holes and simple place the bottles in carefully and lay a bit of soil around it to keep it in place. Once all the bottles are in and soil is added the bottles are not going anywhere .

When it rains the water goes in to the bottles and from there waters your plants. If you make a larger box, I would simply add a few bottles in the middle of the planter so that all plants gets water regularly.


a couple more great ideas


Since I was having issues posting in the last post I figured I would make life simpler and just make another.

I saw both of these a couple of years back. Both excellent idea for small leafy greens, veggies and herbs.

Thursday, December 24, 2009

oregano


Most of the time when we think of oregano we think of it as a cooking spice rather than a medicinal herb. In fact in the US oregano in cooking didn't catch on until after WW2, until this point its use here was strictly medicinal.

Oregano is an aromatic, herbaceous perennial with erect, hairy, square stems. Leaves are opposite, oval, toothed or toothless, pointed and up to 2 inches long. They feature ¼-inch long, tubular, two-lipped, whitish to pinkish flowers typically seen from late July until September. Oregano reaches a height of 12-24 inches, and a width of 10-20 inches.

Oregano is not recommended for children, pregnant women and lactating women. Those who have other health conditions such as high blood pressure or heart disease should not take oregano without medical supervision

The amount of essential oil present in the oregano plant varies depending upon the species and growing conditions. Dried leaves of oregano are commonly used for the therapeutic purposes as well as for the culinary purpose. Nutritionally oregano also contains iron, vitamins, calcium, magnesium, copper, niacin and thiamine. As a medicinal, oregano contains antioxidant, anti-microbial and anti-parasitic compounds.

Parts used are the leaves.
The volatile oil carvacrol present in oregano inhibits the growth of bacteria and other parasitic microorganisms. Some studies have found it to be more effective in killing Giardia than prescription drugs.

Oregano is used for external and internal fungal infections and yeast infections.

Oregano is used for the treatment of flatulence, bloating and other indigestion problems.
serves in improving digestion.

effective in overcoming menstrual symptoms and promoting menstruation.

Some people use oregano as a natural remedy to treat cold and flu symptoms.(as a tea or using oil on the soles of the feet)

Herbal tea prepared with oregano helps in alleviation of headache, urinary problems, lung disorders, diarrhea, nausea, vomiting and jaundice.

Oregano boiled in plain water can be used as a mouthwash. Gargling with this water can help to prevent tooth infection and sore throat.

Oregano oil applied directly to the infected tooth helps in combating toothache.

Ground oregano leaves as a poultice soothe arthritis pain, insect bites and other skin problems.

Its bitter taste and strong aroma help in controlling head lice(use in an oil)

For your pets oil of oregano can be used for a natural remedy for ear mites

Tuesday, December 15, 2009

my thoughts on square foot gardening

Square Foot Gardening is a technique of intensive planting developed by a retired civil engineer, Mel Bartholomew, in the 1970's. Mel describes the technique in his book, Square Foot Gardening, as "a system of laying out, planting, and maintaining a productive, attractive garden in any amount of space. The garden is based on a grid of 1-foot by 1-foot squares, with single seeds or plants placed in carefully determined spacings." Mel goes on to say, "The square foot system lets you make the most of your garden space to conserve the amount of water, soil conditioners, and labor needed to produce a maximum amount of food in that space. A square foot garden takes only one-fifth the space and work of a conventional single-row garden to produce the same harvest."

Intro to square foot gardening

http://www.squarefootgardening.com/


The idea behind square foot gardening is that you can plant fruits, vegetables and flowers in raised beds, above infertile soil and even out of the reach of pets. Seeds are planted in 1x1 square foot plots, and when harvested a new plant is installed in the square. Plants are watered a specific amount each day in measured quantities so it is great for areas where water issues abound. Raised beds can sit directly on the ground or include a bottom layer and be placed on patios, decks or porches. These beds can also be made on raised tables to accommodate bad, backs, wheel chairs and old people that are falling a part. It makes for easy weeding (ain't many weeds), easy watering and and easy picking of produce. I dont care for this method for big n bushy plants. For small gardens I think it is great, when producing all your food stocks for the year it is in my opinion not optimal. Although watering seems simple , it can also become quite the chore, especially in dry climates. The beds leech water so well that the plants can and will dry up and die quicker than you can blink.

I really enjoy using this method for the smaller plants. Beans are great, radishes, lettuces, spinach, peppers, onions, broccoli ,cauliflower, beets, turnips etc are great in them. Tomatoes , squash,,okra, corn, tomatoes n sweet taters are examples of plants that I dont care for growing in the sfg beds.

While I enjoy the methods of SFG's, I don't enjoy the prices of making the soil mix that Mel specifies in his books or on his site. After all, just as in a forum, movie or book he is out to sell something to his readers. In this case it is all the components that go in to his "mix" for planting. For me, it makes for a too expensive garden. I instead mix what I can afford and what we can make from here on the land. I then make my own mix. It is not the mix he suggests but is something similar and I can still use the basic principles in growing.

I do not like the fact that he pushes such specific ingredients for the soil and gives people the notion that unless they do and build and buy buy buy all he suggests that you are not sq foot gardening. I agree that it is a specific method but I don't feel that because you built your sfg bed out of scrap or made your own soil it isn't sf gardening . What makes it "special " is the intense planting and harvesting.

I dare say, that intensive gardening is more the key word in all of this. One doesnt need a special soil mixture. Soil mixtures can be made at home from sustainable sources rather than buying soil mixes. We dont need to buy little plastic grids to be able to plot a bed in to 1x1 squares. String and a tape measure work very well for such things. We do not need to go out and spend hard earned money on materials to make a special bed. A garden can be made out of anything. If it can hold soil and has drainage of some sort, in my world it is a gardening vessel.

The bottom line in all this is that we don't have to follow any one way of gardening, nor should we. Gardens should be as individual as we all are while taking bits n pieces of what we see, read and learn every day and incorporate it into,something that works for us. Don't fall into the trap that things must be done a certain way, it just aint so. I have seen many people lose the gardening bug after trying to follow one specific method of growing, it not working the way they thought it should and giving up. The goal here is to get everyone a garden that works for them not making money off the teaching of it.

Thursday, December 10, 2009

indoor garden update


Been harvesting collards and mustard greens a couple times of week in the loft and a time or two a week from the greenhouse and what is outside. Yes we eat a lot of green stuff this time of year.

Have lost a few more plants to the vermin up in the loft but that problem should be solved now in a timely fashion. We finally broke down and bought poison and whatever is up there took the tray and all last night.

The remaining tomato is starting to flower now and we have eaten the first few beans off one of the plants. The okra is starting to come up as are the next round of peas I planted the other day. I also am starting a few cabbage plants to see what I can or can't make them do.

Tonight in the gh I had to have both the hoop houses and additional covers for the first time. It is very likely to get down into the single digits, so it will be interesting to see how things work out. Last week it got down in the low 20's and I hadn't covered the turnips,they were looking pretty rough for a few days afterward.
photojournal of the indoor garden

Tuesday, December 8, 2009

basic aquaponics systems

Aquaponics is the integration of hydroponics and aquaculture, a sort of symbiotic relationship between the plants and the fish. The fish provide food for the plants, and the plants clean the water for the fish...Many folks raise cat fish or tilapia in the fish tanks thus providing yet another source of food for the table. Aquaponics is basically a closed system, meaning nothing really needs to be done other than the basics of it in order for it to sustain itself. It provides itself with everything...

This is something i have been fairly interested in for a few years and each year it makes it to my goals list but never seems to actually get done. There is a good side to this though because the longer it takes for us to accomplish, the more I get to research and find a solution that we could work with.

Our needs are not much here therefore any system of anything we put in must also be very basic. It must be able to be made with either recycled or very, very cheap materials.. It needs to be able to run on minimal power sources and should also be able to run on a cheap, simple and very small solar set up if need be..

After much research and net searching I have finally found what (don't tell manthing) sort of system I would like to build, barrelponics . Basically a small aquaponic system done with plastic drums, which we happen to have a few of.

Here are free down loadable e-books on the subject of aquaponics and an e book on barrelponics that goes into detail on how to build your own system. Here is a video on this same system.

Here is a system set up by an internet acquaintance that is quite simple but very doable for a beginner It is an excellent size set up for patios and urban setting set setting
patio aqua garden
update

There are many different systems out there. Some more basic than this set up and some that are very large and are actual working farms. Here is a neat video on urban aquaponics, part of a series (which are all good to watch).
http://www.youtube.com/watch?v=kENge...layer_embedded


Tuesday, December 1, 2009

window farming


Since we are on the subject of gardens..

Here is a another sweet idea for those that think they have no where to garden.Though this one uses 20 ounce bottles for the reservoirs, I am sure there are other things that could be used instead.
Be creative and come up with something that will work for you.

It is said that an average size window farm can provide a salad a week. Not much in the grand scheme of things but if one had a few windows to farm, it could make a good dent in food bills and again you know what you are eating because you grew it yourself.

http://our.windowfarms.org/2009/07/3...m-window-farm/


http://windowfarms.org/howto/WF-HOWTO-10-sm.pdf


Here is another version of a simpler window farm..I think these are awesome It is said this version should take less than an hour to set up and have planted out. As soon as the new camera arrives, we will be building our own version of this and I will post updates

Monday, November 30, 2009

plant modules


Here is a really cool concept (or at least I think it's cool) that I am positive could be adapted in many various ways. For those with very limited space, horrible soil that is non tillable , for those where raised beds cant be built to garden and for folks with limited abilities , I could see this as a very viable option. They do look a bit odd until they begin growing and then they are quite cute .

The basic concept is making soil noodles or pods (modules) from a thin fabric which is readily available at greenhouse or agricultural supply stores. Then run a drip line through the center(or not ) and poke small holes in fabric to plant. Next, plant in the holes you have made and there she grows. Its as simple as that.Once these are up and running they are almost no maintenance especially if you run the drip line through them.

We will be trying our version of this here shortly. We will not go out and buy the material because I think we can rig up some old clothing to make the modules, rather than purchasing the fabric. I am thinking that old pillow cases, sheets, blue jeans, even the plastic burlap sacks would make nice modules. When we make our version of this I will be sure and do an update post on it

For the proper instructions go here.