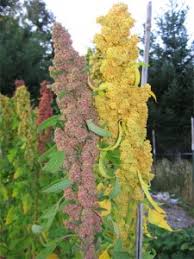
 This is an old post I did on growing quinoa a few years back and never put up.
 (pic is not mine)
The quinoa growing experimentThis past spring we decided we were going to attempt to grow some of our own grains in our attempt to become as self sustaining as possible. One of the grains we chose to grow is called QUINOA or the mother of all grains.For ease in explanation here is a pretty good link describing it. It sone of the best grains available and is super high in protein content (20% or there abouts). It also has all your amino acids in it and very little is needed to be a very nutritious grain for you.
http://en.wikipedia.org/wiki/Quinoa
My own observationsIt was very simple to grow, simply plant and let it go. It withstood both heavy rains as well as dry to drought conditions very well until just before it should have been harvested. The weight on the seed heads did cause it to snap off just before harvest time. I am assuming that part of the breakage was because we planted in rows and it wasn't dense enough to keep it standing .
The plant itself it beautiful, when it is nearing maturity it changes color much like hardwood trees do. There are shades of yellow, reds and oranges in the leaves then they begin to fall off. The quinoa we planted had seed heads that were rainbow colored as well, making the plants even more pretty.
Plants were ready to harvest here in about 4 months time. I direct seeded just after the last frost and harvested the second or third week of august. I simply went out and cut the stalks off then laid them out to dry or hung them to finish drying. Then I rubbed the seed heads between my hands onto a large sheet. Once this was done i harrowed it in front of a fan to get the chaff and junk from the actual seed. This is a bit tedious and boring... OK, it is a lot tedious and boring, but a good job for a useless eater. I then let them finish drying and tossed them into a storage container.
The biggest problem I have had with the quinoa is removing the saponins from the outside of the seeds themselves. The saponins are also what make it a good plant since birds and other animals will not touch the seeds. Removing the saponins is very important before cooking , they can make you very ill or kill you if you ingest too much of them. To remove the outer coating, books will tell you to soak for 12 hours before cooking. I did this and it didn't work . I since have figured out that in order to eat the final product, you need to think about it 3 days in advance of when you plan on eating it and soak them in water for all three days. Change the water out several times a day and mix the grains around in it while doing this. The water may bubble some , much like soap does and it will be a greyish color when you change out the water. When the water runs clear and no more bubbles it should be ready for cooking. A different approach is to soak it for a day or two before cooking, Place it in water boil for one minute, change the water boil another minute and then cook.
It is a rather odd little grain, has a different consistency to it and takes a bit of getting used to . There are a few ways to cook it other than boiling like rice. Some roast it and "pop" it and make something resembling popcorn balls. It has a slightly nutty flavor to it when done this way. It is often seen in vegan and veggie dishes and there are a few cold salads that it can be used in... It can also be sprouted and used as a sprout.
Overall, it is not bad to grow, harvest, or cook. Its pretty and can be grown in some pretty rotten soil and conditions. As a survival food it would be good to grow in a garden or in a guerrilla fashion. It will reseed itself and grow again the next year. One other thing I did notice was that it will begin to sprout in the field when the seed heads are ready and a big rain comes so it is important to get it out of the weather when it is ready for harvest. I lost a few plants of it this season by not realizing just how easy it goes to reproducing..
PS...I forgot to mention that we planted only one small pack of seeds this spring in ground that had only been tilled in order to plant grains. In total i had about an 80 row of quinoa (was actually four 20 foot rows). No fertilizers or nutrients of any kind were used so the soil base is hard chunky clay for the most part . When all was said and done i got about 4 pounds of quinoa for cooking purposes or two quart jars which for us would be about 8 meals as a side dish. All total time spent between harvesting n harrowing was about 3 hours in addition to the time spent tilling, planting and weeding once.
We are thinking next year of just scattering some seed in an area using the broadcast method and seeing how this turns out rather than using tilled garden space for this grain...
PPS...We have since been growing quinoa in non garden areas and it seems to do quite well that way. I just leave a few plants to do the reseeding for me and it comes back year after year.


 With the success of the hot tub hugulkultur bed we decided to try it out in a normal garden bed. For this experiment, we are using use an already established bed (of weeds) that we double dug when the manthing was laid off and we were on a bed building spree. This bed has not successfully grown anything (except weeds) since we dug it and began throwing amendments on it. It was also convenient because we had some piles of brush nearby, making our job (manthing's job) much easier.


 The process is pretty easy although it is a good work out if you don't have a mechanized earth moving contraption and live in mountainous terrain. This bed is about 14x5 and was a 2 (half day) job for one person. A young, in shape, person could probably do one in a day and live to tell of the experience. Us older folks have learned not to beat ourselves up when time is not of the essence so we tend to take things a little bit easier when we can.
  A few years ago we found ourselves with a hot tub that no longer functioned. Rather than hauling it off to the dump we decided to make a garden out of it. Because we were completely unemployed at the time, an economical way had to be found to use little soil yet fill the tub up so it could grow veggies. After some research, we decided to try an experiment with hugulkultur in a controlled environment. We filled that sucker up with brush, leaves, and dead wood, tossed a layer of compost over the top, then waited and waited and waited, all the while growing veggies in it. Our hope was that the experiment would be successful enough that we could use the hot tub to build soil that was good quality for adding to already established beds or for making new ones since true soil here is nonexistent.

 This spring when we began digging to see how things were going Lo and behold, everything had decomposed and we had three feet of beautiful,wormy, healthy, happy soil.
 I am currently in the process of moving the soil to where I need it and only saving enough of it to begin the process again. It worked well enough that we are now working on a couple actual beds using the same methods. It will be interesting to see how they turn out. Though hugulkultur is a great method of building soil it does have a couple of downfalls that I will post about in the next installment of our hugulkultur experiment.
 My year of Seeds Of The Month has ended. Yes, I am an adult but everyone loves to have a package delivered and for a gardener, seeds are the ultimate gift. I have really enjoyed the SOTM and not just opening the pack to see what is inside but actually growing the veggies and herbs. All seeds are non-gmo, open pollinated, heirloom varieties that have been tested for a germination rate of 90% and higher. Everything I have received has grown and produced well for me even though I have used many for experimental purposes and treated them harshly. The cost of the seed club is very economical and well worth it, especially if one is able to catch a web special. For those new to gardening or for children, it is an excellent way to pique interest and give a gift that will give forever more. Overall, the seed club is very well worth the money and offers quite a nice variety of seed.
 Today the broccoli babies went from their germination trays into cell packs and were kicked out to the GH to live in the fish tank until planting time. The tank can be covered with a plastic cover if it gets too cold for them, though after this winter it is doubtful they will need it. In addition to these little guys another 40 or so were planted into a GH bed and an outside bed with a makeshift ghetto GH over them on the cold nights. The plant markers are made from old window shades that I have been snipping sections off of when I need markers.
 Two years ago when, we had the glut of peaches from our then lone peach tree, many of the peaches ended up on the ground or eaten by critters. Unlike any year prior, all those peach pits sprouted into tiny trees, so for kicks I decided to let them grow assuming most of them would die a natural death. Oddly enough, most actually lived through their first winter and and all through last summer and on through this winter (what winter we have had and it aint much). Between not having time, having bad weather when we did have time, having people say they were going to move them and then not and my own laziness, I just got around to digging several of them out today and replanting.
 Folks that have followed my ramblings for any length of time know that one of my hobbies is finding a suitable alternative to coffee. This time around, the adventure was using turnips. For hundreds of years turnips were animal fodder rather than people food but during the early 1900s in Germany, they became a staple food item. They were used as a coffee substitute, flour substitute and became a primary ingredient of many dishes including war bread.
 With the weird winter we are having this year, planning and planting of the gardens has been quite a challenge. We have had next to no winter weather and nice warm days with few cold nights which makes it very hard to hold back from planting early crops.
 After coating the cistern with the sealant, the weather took a turn for the worse. It continued to rain for an entire week and nothing was drying out even with a fan and a heater running in the room. The biggest issue, however, was the seepage from the blocks themselves. It is amazing how much water a cinder block will hold. The water seeping from the blocks made the sealant slide down and puddle and we were again left with bare cinder walls. There were also a couple spots that we decided could use a bit of hydraulic cement too, just in case.Those minor patches were made and then it became a waiting game. MothEr always wins so after a couple of days we realized that time was the only cure for the mess we had created. We decided it was best to just shut the door and forget it.
 We would like to think the cistern project is now a done deal but we can't be entirely sure of it.
 We decided that since the cistern was well over 20 years old and had never had any maintenance that it would be wise to completely go through it and hopefully be done with it until we are too old to be doing such things. We also had a fairly decent window to get the work done before the weather turned, a big bonus in January. The bad part was that our window was a fairly small one for the work that needed to be done so it meant bustin our butts a little bit to getter done.
 We had to start by finishing emptying the cistern, so we brought the 325 gallon tank up and filled it. We knew we would be without any water for at least four days and perhaps more depending on the weather. This left about 3 inches of water and a big layer of nastiness that had collected on the bottom for twenty odd years. The only way to get it out was by climbing in and bailing the water out by the bucket full, lifting it over the edge and having the second person hauling it out to dump. It then had to be completely dried and scraped down to remove the old sealant and expose as much block as possible. After getting as much out as we could , it was decided the kitty litter soaker upper stuff would work best to dry it then we could scoop it out.
 Once it was all dry we made any repairs that needed to be done and could then begin applying the sealant. After applying each coat of sealant it needed to dry for several hours before the next layer could be done. Last night, we were able to get the second coating on and decided that the rain was not going to come in until late this evening so we would do a third and final coat this morning We also neglected to pull the gutters from the pipe going into the cistern since there was only a 10% chance of rain. At 3:30 this morning we had a middle of the night trip to pull the gutters out and protect our masterpiece.
 The final coat went on this morning and we are now hoping that the heavy rains that are forecast do not come until tomorrow so that we can put the gutters back in, fill the cistern and see how the pretty cement pond works.

 Just as I was beginning to wonder if the mushroom logs were going to do anything before winter set in, low and behold I checked them yesterday and noticed we had some beauties ready for harvesting. We got about 4 pounds of the oysters and I do believe I saw a few shitakes growing under there. Hopefully the rains coming in will get a few more grown out before the cold weather sets in.


